Designing an Outdoor Seating Area with Earth and Upcycled Plastic Waste
This article is part of our How-To series, offered to support the study and practice of sustainable and compassionate living. Please take all sensible precautions if putting these ideas into practice. Those with less experience are advised to seek guidance and support from experienced practitioners.
Quick Facts
BRIEF
Design and construction of one or more outdoor benches and associated elements in order to create a unified seating and group discussion area. The design shall seek to integrate with, and enhance its surroundings.
TIME & LABOUR
Design phase: 2 interns, 3-4 weeks duration (as part of Internship for Vernacular Eco-Architecture).
Construction phase: 10 people, including local masons, interns and volunteers. 1 month duration (as part of a series of workshops).
COSTS (material)
(breakdown)
Total material costs: approx. 7000₹
—-———-
Mud: 0 ₹ (from site)
Slate: 500₹ (25₹/tile)
Bamboo: 1000₹ (100₹/bamboo)
Dressed stone: 840₹ (14₹/stone)
Infill material: 0 ₹ (existing plastic & glass waste)
FRP sheet: 2400₹ (60₹/sqft)
MATERIALS
(main)
(secondary)
(waste materials)
Adobe bricks (150-180 pieces)
Plaster and mud mortar
Cob mix
waterproof plaster finish (lipai, a local technique similar to tadlakt).
Dressed stones (50-60 pieces)
rubble
slate
bamboo
cement
fine gravel
sand
rebars
varnish, oxide for pigment
FRP (fibre-reinforced plastic) for sheet coverings.
used plastic bottles (130-150 bottles)
soft plastics (approx. 15kg)
broken glass (approx. 5kg)
AREA & DIMENSION
Footprint of total bench area: 320 sqft
Double-tiered bench
surface area: 58.70 sqft
height of bench a (first tier): 18"
height of bench b (second tier): 36"
C-shaped bench
surface area: 18.9 sqft
height of bench: 18”
Canopy
surface area: 270 sqft
highest height (at existing wall): 12ft
lowest height ( sloping away from wall): 10ft
How-To Articles
Overview
As a part of our training in the Internship for Vernacular Eco-Architecture, Dhanya and I were assigned to create an informal, multi-purpose outdoor space with seating areas for people to come together and collaborate or rest, or to hold outdoor classes or discussions. Already existing on the site were an L-shaped bench, a wall façade at one edge of the space, and the surrounding gardens and landscape, with all of this being key aspects of the context we needed to consider in the design process.

BEFORE: Our starting point was an existing bench constructed by a previous group. They experimented with, and wanted to showcase many techniques in one form. The result was an L-shaped bench with differing elements. Together with the tall side wall of the dormitory building, the footprint we had to work with was strongly demarcated in a 'masculine’ language.
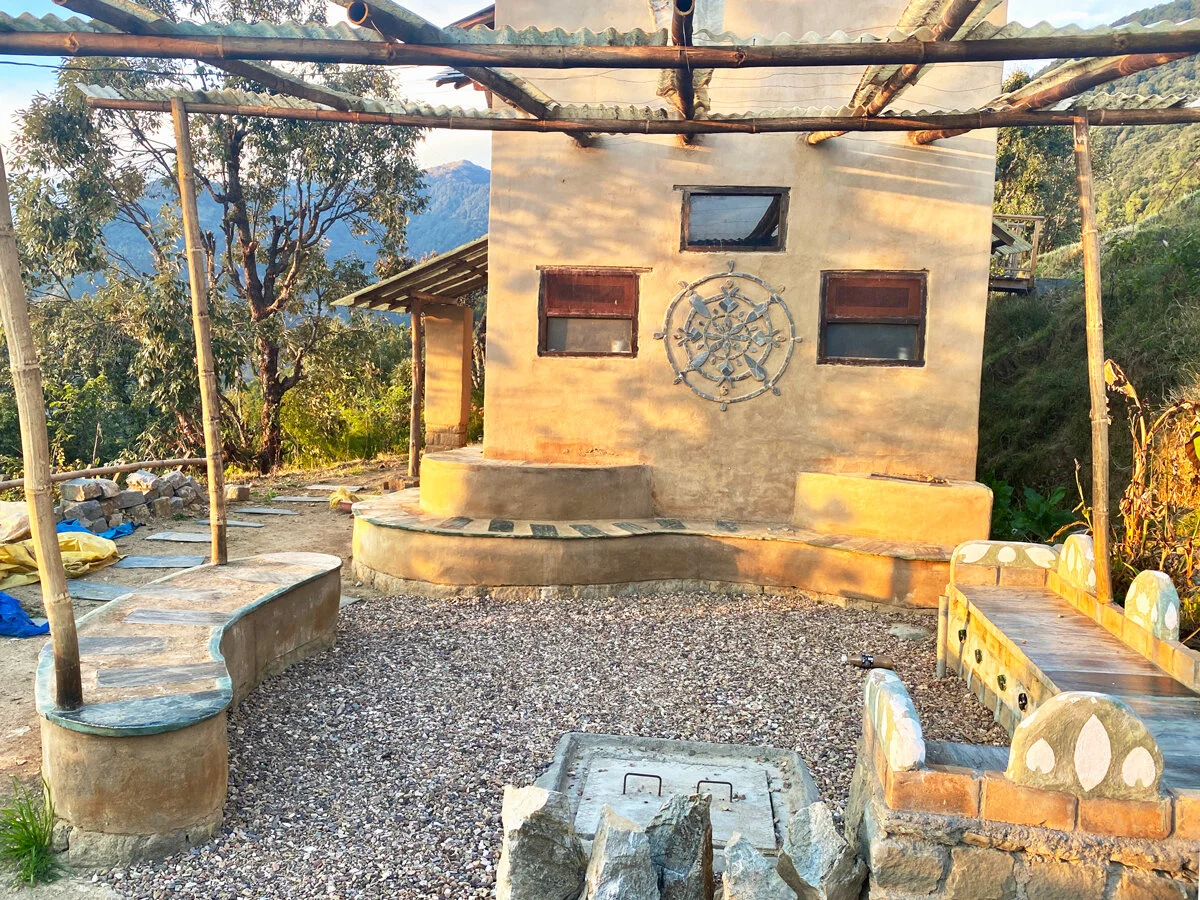
AFTER: Our completed project responded in a 'feminine' manner. Soft, curved forms were sculpted from observations of circulation pathways, height mediations and providing a sense of 'welcome’ from various locations. Bamboo roof beams fitted into existing holes in the neighbouring wall while loose pebbles that were easily available on-site were a simple strategy to unify new and old elements through the floor surface.
Design Phase
The collaboration between the two of us was quite interesting because even though we were like two seeds in a pod, our personalities and perspectives can sometimes be quite different, but our friendship, mutual respect and imaginations encouraged us to see valuable things in each other’s perspectives about the project.
It wasn’t just about what the eyes saw, but also how we felt experiencing the space itself. Even though there were many similarities in the ways we each felt into the space, each of us also had unique and complementary observations. This was a win-win in that it helped develop our sensitivities and skills while also enhancing the results for the project. Through this collaborative design process, we were able to arrive at a design for the space that felt in harmony as a whole. Our collaboration gave birth to a space that harmonises well with the surrounding environment and represents our personalities and our relationship in a playful and natural way, inspired by the Japanese concept of wabi-sabi — imperfect and beautiful, with a longing to be perfect, maybe someday but not just yet.
The very first step to create a space where the users and the surroundings feel in harmony is to be in harmony with yourself, to be present, to be aware, to feel grounded enough that you sync with the environment of the space such that you don’t force your preconceived idea on the space, but ask the space what it wants and let it be that.
How did we start doing that? We use meditation to calm our conceptual minds and drop any kind of perception we might already have for the space and its design. This is tricky to do as what one has already learnt, practised or experienced in a similar context before can tempt one into thinking that our own idea is what the place wants, too. So the aim during this phase is just to observe and experience the space with an open mind and body. The head-mind observes and analyses the technical aspects of the space, while the heart and gut minds experience the space in non-conceptual ways.
The next phase is about being playful in and around the site and creating what the space wants, which can be done only when we allow ourselves to understand the space like a friend, while continually asking ourselves if that is what feels the most natural, and thus the best for the space.
Careful observation of the existing context helped us understand the space like a friend, and after a lot of playful experiences in and around the site, we developed a clearer feeling of how the space wants to be expressed.
The existing L bench, with its masculine design aesthetic, was the starting point for us. To balance the angular masculinity in the space we needed something that was feminine in its character. The form, the way the structure interacts with the user, as well as the materials used to make it, needed to balance the L bench aesthetically. So we imagined a curved-profile bench, to balance the L-shaped bench with the soft character of our main, simple and beautiful material: mud.
The positioning of the L-shaped bench against the swale also helped us question the placement of the new benches. One of the new benches needed to sit somewhere where it didn’t disturb the movement in the area, and would have a good view, while another curved bench wrapped around the building to soften the corner of the tall building. This was chosen as our design response after studying the movement patterns, existing paths, views, human comfort, and so forth.
The space between the benches was also something that needed to be observed and analysed. This helped us create a design that can alter the experience of the place substantially. The distance between the benches and the profile of the new benches was decided after playing with different possibilities and mapping the new structure that needed to be developed. This was done to understand how the new bench structure might feel before the construction even began, which helped us consider the whole.
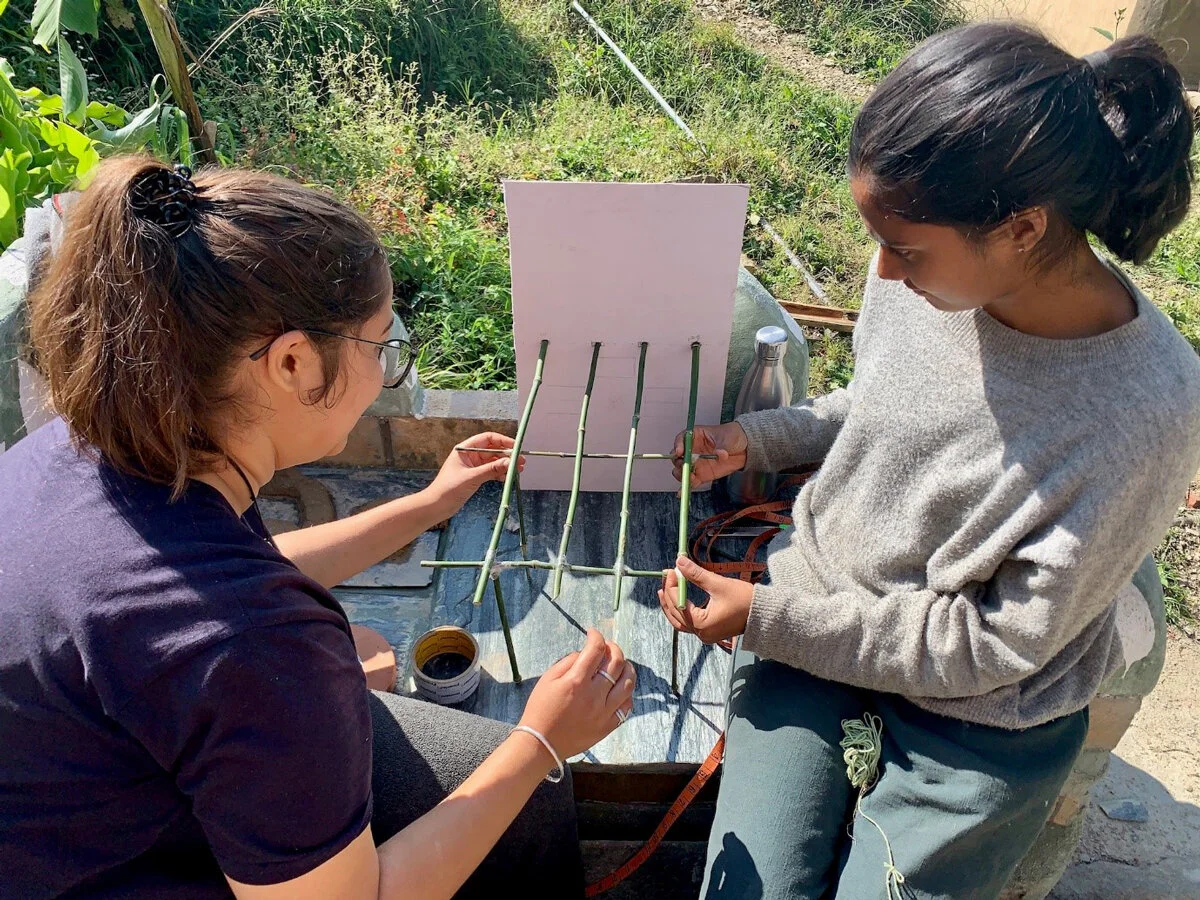
Understanding context and design through model making
The next step for us was to work out the technical aspects of the design process. The total time that went into designing the project — including various observation exercises at different stages to help us understand the site and its needs, analysis, and working on the technicalities — was about three to four weeks.
Construction Phase
Construction took about a month of work. This included training the team and building the structure with a total of ten people including the local mason, interns and volunteers.

Pre construction discussions and design explanation
1. Soil testing
For any kind of earthen construction, the very first step is to gather our main material, the mud. The very first step should be to test the soil for your needs, which will help you to be sure if the soil available on site is suitable for your requirements. (Note that, for ecological reasons, it is preferable to use soil from your own site if possible rather than bringing it in from another location.) If the soil you have on site is suitable, then preparing the soil for use in construction is the next step.
2. Sieving the mud
First, the earth is dug. (Pro tip: Ideally, one would take the soil from a site where you would need to dig or level for another project, because that would allow you to accomplish two tasks at once.) Before digging begins, the topsoil is removed and preserved for the garden beds. Then the subsoil is sieved for the making of adobe bricks and mud plaster.
After digging, the larger particles of rock are separated from the earth mix with a sieve. For this project, the dimension of the mesh used for sieving is 5x5mm for adobe bricks and 2x2mm for the second coat of mud plaster.
3. Pugging
The term ‘pugging’ comes from the Sanskrit word pag, which means ‘feet’. So, the pugging process is basically about playing in the mud with our feet to let all the components mix together well. This is one of the most important steps to ensure the strength of our mix. One can imagine pugging as kneading dough: the mix needs to becomes smooth and water should be absorbed thoroughly with no dry patches or clumps left in the mix.

Being grateful to earth and sieving the mix for helping us build

Work and play during pugging
For our construction process, the mud mixture is comprised of rice husk, pine needles, and soil in the ratio 1:2:10 (the ratio can be modified depending on the requirement of your design and construction). We use pine needles to provide tensile reinforcement in the bricks, and we use rice husk both for insulation and to make the bricks a bit lighter. (As always, context matters: these materials can be changed depending on what materials are available in or around your site.)
The mix was pugged in the daytime and then left to settle overnight for five consecutive days so that the particles in the mix have the chance to bind together at the molecular level. For this, one gets the best results from having many feet pugging together, while singing and dancing and playing in the mud. And, at the end of all the fun, thanking the earth for helping us build is always a good idea.
4. Making adobe bricks (sun-dried earth blocks)

Making adobe with love in the form of mud
We use custom-sized wooden frames as per our requirement which gives us full-sized bricks , queen closers, chamfered bricks and half-bat bricks. Our full brick size is 12” x 6” x 3”. The custom sizes help us save time and material during the construction process, as with multiple sizes pre-made we don’t have to break the full bricks when smaller sizes are required.
Adobe bricks were made in the following manner:
a) The frames are soaked in water and cleaned thoroughly before starting the process of making the bricks.
b) A big blob of pugged mud is then thrown in the frame (while it is still quite wet) and gently compressed by hand to make the bricks compact enough.
c) Any extra material is then removed with one stroke that leaves the top face of the brick smooth, immediately after which a frog (a unique design, stamp or signature unique to each brickmaker, drawn by finger) is created on top, and then the frame is removed in one smooth motion.
d) The bricks are then sun-dried completely, which takes a few days (depending on the strength of the sun), and stored to be used later.
Learn more about the steps and process of how we make our adobe bricks at Dharmalaya here.
5. Line-out and Foundations
The process of digging the foundations begins with a demarcation step we call ‘line-out’ because we draw on the earth to outline the edges of the foundation trenches to be dug. During this stage, always refer closely to the design drawings to be extra-sure that the dimensions are correct, as any mistakes made at this stage might be difficult (or sometimes impossible) to correct properly later.
We outlined the footprint of the bench structures by referring to the drawings, measuring the footprint on the site and marking it in situ with lime dust, cross-checking frequently to make sure all dimensions were correct. Once the line-out was finalized and reference poles were put up, a 6” deep trench was carefully dug out (Note the building foundations require much deeper trenches, but since this is just for a bench, 6” is adequate). Random rubble masonry was used to fill the foundation trenches.

Putting each stone with a lot of care and contemplation
After filling in all the gaps with smaller pebbles and soil, we compacted the foundations, bringing them to the required level, keeping in mind the existing ground level.
It is always important to think about the whole structure while constructing each stage of it, so as never to lose sight of the whole.
Here, because we wanted a bamboo roof, vertical rebars were placed in position while filling the foundation trenches, to provide support for the bamboo members of the shade roof to be built in the last stage.
6. Plinth: stone masonry with upcycled plastic waste

A solution for upcycling waste
The height of the stone plinth should be enough to raise the earthen elements of the structure far enough above ground level to avoid water damage in case of heavy rains.
Dressed stones were used to build the plinth above ground level, held together with mortar made of sand and cement in a ratio of 6:1 (note we would have preferred to use lime mortar if slaked lime were available in our region but since it isn’t we used a small amount of cement as a substitute). The insides of the bench were filled with plastic bottle ‘bricks’ that were made by collecting soft plastic waste and stuffing it into plastic bottles until they are densely packed (one possible solution for upcycling any unavoidable plastic waste). The voids between the bottles were filled with broken glass pieces (also upcycled waste), rubble, and soil to achieve maximum compaction. This upcycling of waste as a building material in a small, uninhabited construction project is one of the ways we deal with the waste that we still generate while we’re still making progress on the path toward our zero-waste goal, recognizing that in the popular mantra of ‘reduce, reuse and recycle’, the most important words are the first two: reduce and reuse.
The estimated number of dressed stones used for the construction for the project was 50-60.
7. Adobe masonry
Above the plinth, the rest of the masonry was done with mud, using the adobe brick and mud mortar which is a mix of roughly sieved mud and water.
A good masonry practice includes being mindful of the horizontal and vertical levels, avoiding joints during the masonry and minimal wastage of the material. During this masonry process, the levels of the structure are continually checked with a plumb bob and water-level pipe at various stages to avoid going out of plumb or off level.
The estimated number of bricks used for the construction for the project was 150-180 bricks.

Meditation in the form of Adobe masonry
8. Cob Technique
Cob, another popular technique of earthen construction, was also used here to achieve the desired top level. Instead of breaking each brick in half to attain the final level, the better choice was to use cob. The cob mix was made by mixing the straw cut in small lengths with pugged mud in a ratio of 1:5.

Different requirements. Different solutions
Blobs of this mix were made, placed by hand, and then shaped in situ as per the requirements of the design.
9. Slate placement

Meditation in Action, ‘Slate cutting'
For waterproofing and stability, a PCC layer was placed over the cob (after it had dried) to create the required bed for slates on top. The PCC consisted of cement, fine gravel and sand in the ratio of 1:2:8 (again, this ratio might be changed depending upon your materials and requirements).
The slates were cut precisely to create a lip for the top of the benches and were set in place using cement mortar. The slightly cantilevered lip, which must provide enough strength at the edges of the benches to resist cracking or chipping, helps protect the adobe structure below.
Grout was applied in the gaps between the slate tiles. The grout consisted of green oxide, cement, and water. Green oxide is used for colour only, because who doesn’t like a little more green in life?
For the remaining surface, the mud plaster was then applied, which had lime and mud in a 1:2 ratio. A mix of flax seed husk with water was then smeared on the mud plaster to protect the mud with its water-resistant properties, and the top face was burnished to achieve the smoothness that we wanted for this context (burnishing also helps with water resistance by decreasing the porosity of the earthen surfaces).
The slate tiles were sanded thoroughly with pumice stone until all the tiles were smooth, and were later varnished.

Finished Slate Placement

Sanding slate using pumice stone
10. Plaster

Connection to the sense of touch with ‘Lipai’
Plastering is done to protect the structural components (i.e. the adobe bricks and other earthen material here) from wet-weather conditions. Plastering is done in three phases. The first coat of earthen plaster uses coarse mud and water. This is done to give a proper shape over the bricks to the structure. This coat’s thickness ranges from 5mm to 10mm. Second-coat plaster is made by first making a well-pugged mix of finely sieved earth and then adding flax seed husk soaked in water, lime, and cow dung (in a ratio of 10:1:2:4, in this case). The thickness of this plaster ranges from 2mm to 5mm.
For the final coat, lipai is done, which is a traditional finishing layer in our region. For this, cow dung and water are mix together to form a gooey slurry and is then applied on the surface.
The general application process of plaster is as follows:
a) The surface is made wet so that the plaster mix can easily stick to it.
b) A thin coat of plaster mix is smeared onto the surface with a trowel or hands to achieve the desired finish.
c) The whole surface is then covered with the plaster and an even (but slightly rough) surface is created.
d) Once the first coat dries thoroughly, the process is repeated for the second coat similarly, but with a smoother finish this time if desired.
e) The third coat (lipai) is done once the second-coat surface becomes dry and is cleaned well. The way of moving the hand while doing lipai can be experimented with, as lipai leaves imprints of our hand movements on the surface, so this can be used to create pleasing patterns if done sensitively. (It can also be removed if you prefer, leaving a smooth surface by carefully cleaning the surface while the lipai is still wet.)

Smiling faces enjoying the creation of mind, body and soul
11. Roof
a) Bamboo smoking

It takes a village for doing great things like Bamboo Harvesting
A bamboo roof was planned for this space, so we needed some treated bamboos. Bamboo treatment is done to protect the bamboo by removing starch from these grass plants to reduce the chances of insect infestation (since otherwise some insects eat the starch in the bamboo, which can weaken it over the course of years).
The bamboos should be harvested only during the winter, and not at any other time, as the starch content is very high during the warmer months due to the presence of sun for longer hours and thus more photosynthesis, resulting in high amounts of starch in the bamboo if harvested during non-winter months. For best results, follow the tradition of harvesting bamboo only during the new (dark) moons of winter, when the bamboo plants are exposed to the least amount of sunlight and thus have the lowest sugar levels, which means they’ll have the lowest starch levels when they dry.

The magical process of Bamboo treatment using smoking technique
Treatment Process:
1. The bamboos need to be cut and cleaned properly.
2. Bamboo poles are then stacked inside a bamboo kiln or other improvised sealed structure that retains smoke (doesn’t let the smoke vent out) so that all the bamboos can be smoked in the most efficient way.
3. For the purpose of smoking, almost any plant matter can be used, but certain plants are preferable for their qualities, depending on your region. In our area, the invasive weed called Basuti (Chromolaena odorata, a.k.a. triffid or ‘devil weed’) comes in handy. The pungent smell and toxins in the weed help to keep the insects away.
4. The bamboos are smoked for at least three weeks (relighting fires twice a day or as needed to keep the structure continuously filled with smoke).
5. After the completion of the bamboo smoking, the bamboos were wiped clean and used for the roof.
b) Bamboo joinery
The vertical bamboos were placed over the existing reinforced steel rebar rods that had been installed during the foundation stage (see above), so that the rebar slides inside the center of the bamboo poles. The vertical rods give the bamboo support, helping them to stay upright and fixed in position.

Placement of vertical bamboos on supporting bars
The horizontal bamboos are then laid as per the design and joints are made for easy attachment of all the bamboos to one another. All the bamboos were covered with thin strips of FRP (fibre-reinforced plastic) sheets to protect the bamboos from the direct rainwater and sun, otherwise the rain-exposed bamboo would eventually weather and crack. They are then nailed together to create the final structure.
12. Planting
Plants, creepers, trees, shrubs etc are then planted as per the design.

Pushpa didi helping the plants thrive
Completion
The whole construction process was a great learning process for everyone in the team. From the very beginning of the idea to create a space where people felt held and spacious to be open, to the informative training and construction process and later enjoying the space that was created by the help of so many people collaborating, learning, playing and working together.


C o m p a s s i o n a t e L i v i n g R e s o u r c e L i b r a r y
HOW-TO SERIES | COMPASSIONATE LIVING | DESIGN | EDUCATION | FOOD-GROWING & LANDSCAPING | HEATH & WELL-BEING | NATURAL BUILDING
RECOMMENDED BOOKS AND FILMS | FREE ONLINE RESOURCES | PARTNERS & ALLIED ORGANISATIONS